Container Buildings
The original appeal of using shipping containers as a building material was that far more containers were coming into the US (and Europe) than were going out, so there was a huge oversupply of them, and hence one could get one cheap. The further lure is that as manufactured containers are immensely strong: they are able to hold many tons of cargo. Empty 20' containers weigh 4500-5000lbs and are designed to carry loads over 60,000 pounds. As building with shipping containers has become more popular, an additional lure is that some people like the look of the finished building made from shipping containers. Some people even build with new shipping containers, but as a "green" idea that clearly defeats the original purpose.
Properties of Shipping Containers
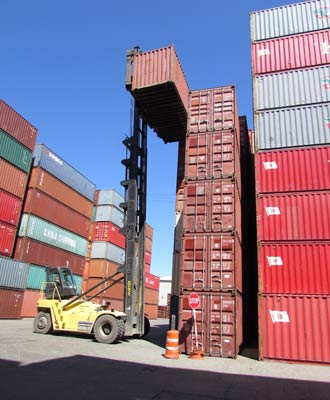
Containers stacked at a shipping terminal
Photo: Jon Alexander
Shipping containers are made to a standard specification, and although they are made in a variety of sizes, most containers are of two standard sizes: 8x20x8'6" and 8x40x8'6". There is also the "high cube" version of both of these, which is one foot taller. These are external dimension--the internal dimensions are smaller--for example in a standard container, the internal ceiling height is 7'10". The majority of the containers are built in China. The most common containers will carry around 60,000 pounds (all sizes have a similar weight capacity) and this corresponds to 500lb/ft2 for the 20' container and 250lb/ft2 for the 40' one: both values are far higher than you would typically encounter in a building. There are actually about 50 different kinds of containers (see isbu-info.org).
Full containers can be stacked between 6 and 9 high, although the catch here is that the load from the upper containers is carried only on the corner posts: in fact this is the only way they are designed to be stacked, so if you want to stack them some other way, for example cantilevered, or in the form of a "T" or "L". you will need to do structural analysis4 to figure out whether you will need additional support in this configuration. The corner posts are slightly longer than the height of the container, so when the containers are stacked on each other only the posts touch: there is an inch or so gap between the container bodies. Each post has four holes in it: two on top and two on bottom (one lengthwise and one widthwise), and these holes are used to tie the containers together with standard clamps. In their use as housing, the corner posts are more typically welded together somehow.
Most containers are made on a frame of square channel steel, with the four corner posts being the largest and thickest gage. All sides except the bottom are made from steel sheet metal, typically corrugated. The steel is a special alloy called Corten, which is designed to form a patina of oxide on the surface that stays as a protective layer, so theoretically they don't need painting: in reality, the steel will rust thru in some situations and the containers are usually painted. The bottom of the container is 1-1/4" thick marine plywood, and there are typically steel supports under the plywood. The plywood is often treated with some kind of preservative, and hence should be treated as toxic as a precaution. If the container is used, the plywood may have had other chemical spilled on it during its lifetime. Likewise, any paint may contain lead, other heavy metals and various fungicides, so when striping paint, one should beware.
While shipping containers are immensely strong compared to the lightweight construction, their strength comes due to the container being an integral unit. Although there is typically a frame, much of the strength of the container is due to the sides combined with the frame acting as a single unit, somewhat like an I-beam1. Once you start cutting holes in the sides, the strength will be reduced, although by how much isn't obvious. Because the containers are designed to carry much higher loads than you'll likely encounter (at least in small scale residential construction), clearly you can cut some holes and the container will still be strong enough. Keep in mind however, that the container is designed to carry that heavy load on its floor, not its roof which is not nearly as strong. However, the roof is still quite strong: it must carry about 200lb/SF (although what the spec says is that the roof only has to carry only one 200kg load spread over about two square feet. The idea being that the roof will support two workers standing side by side).
Keep in mind that shipping containers are made by many manufacturers and the standard accuracy is only that the standard couplers will clamp two containers together. They can easily be off by 1/8" or more, and the floors of various containers will not necessarily line up. Shipping containers are designed and built to be--you guessed it, shipping containers--not buildings, so any constraint of building a house that is not required of a shipping container will also not likely be satisfied by one. In other words, expect the unexpected if you've never worked with them before.
Using the Containers
There are two things you will almost certainly have to do use a container as a building: cuts holes for doors and windows and insulate. In addition, you will likely have to add a roof of some sort, although you may be able to skip this step for some number of years.
Cutting holes: you can cut reasonable size holes for windows and doors without the roof of the container collapsing, but if either you're expecting the roof to carry some kind of load or you start cutting a large number of holes, you will need to reinforce the area around the hole. There is unfortunately no standard here, or even really a ballpark guideline. The issue is that the roof strength is only specified to carry two workers (200kg) spread over two square feet (not exactly two square feet since the spec is metric, but close enough).
Drilling small holes in the walls or roof is done with normal drill bits, and somewhat larger holes are done with hole saws with as many teeth as possible. If the roof carries no load, then its just a matter of keeping the sides from buckling under the weight of the roof itself. Since this is an unconventional structure, you'll need a structural engineer to design whatever supplemental structure is necessary. If you happen to live in a place with no building department you can skip the engineer, but you risk the building failing.
Insulation: Almost all buildings in almost all climates need some kind of insulation, and this is even more true in metal buildings because metal is such a fabulous conductor of heat.2 While many have insulated on the interior, keep in mind that containers are already very narrow and that containers have only a thin skin to keep out the rain. Most buildings have two rain layers: the actual cladding and some kind of drainage plane behind it (tar paper, house wrap etc). Keep in mind also that they're designed to be shipping containers with a twenty year lifespan--not buildings.
The most common type of insulation is foam: spray foam on the interior and foam board on the exterior (of which most have high global warming potential and contain potentially toxic flame retardants). If using exterior insulation you could opt for rockwool boards or any of the other environmentally preferable board insulations, and of course you could build a framework and fill it with any kind of fill insulation (you could do that on the interior also). One convenient thing about containers is that you can readily screw into the sheet metal and because the metal is quiet thick, the screws seem to hold very well. This allows for attaching batten both inside and out: in particular you can install an external rigid board system the same way you do on a wood frame house (that is assuming the screws hold just as well in the sheet metal as they do when sunk into 2x4 studs)--the downside obviously is that the ends of the screws will the sticking out inside.
Roof: the strength specification of the roof is essentially a point load of 200kg (the load is ballpark 200lb/sf, but that 200kg is the entire roof load: nothing in spec says the roof has to carry 200lb/sf over its entire surface). However, in order to provide that strength the roof is quite strong, particularly along the edges where the sides also support it. As with everything else with containers, any strength specification is only true if the sides have no holes in them, and in all likelihood you will want windows, hence your container's sides will have holes.
Essentially you have four choices for a roof:
- Use the existing container roof as is. If you have no snow load, your main concern is that the roof is fairly flat and won't drain well and you have to find space for insulation If you have neither snow nor rain, you will likely want quite a bit of insulation against the sun.
- Build a sloped roof of some sort and support it on the container walls. In doing this you can either do some strength calculations (or hire an engineer) to make sure the container will support it, of just don't cut very big holes in the walls and hope for the best.
- Treat the container is being fairly weak, and put in a support beam to span from corner post to corner post, potentially with new mid-span posts. This could turn out to be overkill, but you're at least sure the roof won't collapse, and you don't have to do non-standard calculations to determine the strength of the container with holes in it.
- Built and entire support structure outside of the container so the roof doesn't sit on the containers at all. This might cost more, but if you have a convenient supply of metal farm building parts, you can probably get the whole thing as a kit.
Stacking: containers are easy to stack directly on top of each other, but more of a challenge to stack any other way (see properties, above). Although they are made to stack directly, there is no interlock mechanism to align the upper container precisely with the lower, so if you want them exactly lined up, you will probably be hammering the upper into place while the crane operator holds enough of the weight so you can move it. Once placed you need to attach them to each other somehow, for example by just welding one post onto another.
Design Issues
Containers buildings have similar layout design constraints to mobile homes, although quite a bit more restrictive since most mobile homes now are built in 10-14 foot sections instead of the original eight foot width. Residential room dimensions tend to run from 10 feet to 16 feet, with 11-13 feet being very common, so there is an immediate mismatch between the container width and desirable room widths. That means that you will either be putting two or more together to increase the width or designing very narrow rooms.
Because they are designed to be stacked exactly over each other, any design that wants to do something different (cantilever for example) may require extra reinforcing in the lower containers. Typical residential buildings have much lower loads than filled shipping containers, but since stacking them other then directly on top of each other is unchartered territory (well not completely its certainly been done), a design should be done by an engineer.
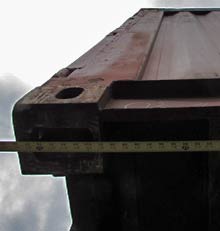
Corner posts project a small amount.
Photo: Jon Alexander
If you are just arranging them on the ground, they can be in any configuration since there are no load issues, but keep in mind that the attachment points of each container stick out a little bit so you may not always be able to get containers to exactly touch either other. Containers will also vary in size a little bit: depending on which dimension, they can be up to 1/4" (1/8"??) different.
If the desired space is more than two containers wide, one idea is to just allow the two side containers to define the middle space. Doing this does mean you'll have to fill in the two end walls, a ceiling and a floor, but the alternative is often to remove most of the both walls of the middle container, which means the roof has to have additional support. The plus side is that the middle space no longer has to be 8' wide. Its not necessarily the way to go, but does add another design option.
Example Container Building
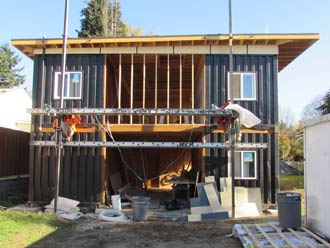
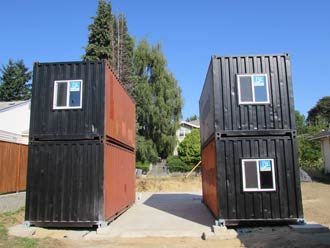
This project, located in Seattle is a conditioned 18' high, 560SF house with an attached 1400SF of unheated workshop, storage and garage space located in the rear of the building. The photo at right is from the rear of the building: a pair of stacked containers define the perimeter. By spacing the containers 12' apart, more usable space was created with minimal framing, while also avoiding the structural complication of removing most or all of the interior container walls. The only openings put into the containers are the three windows in the photo. The main house sits directly in front of the container section, and all share one common roof.
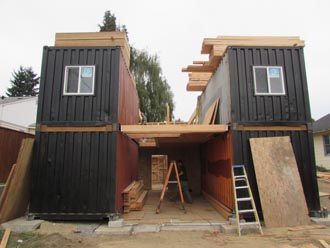
Each container sits on large corner footings only, and then there is a "T" shaped unheated slab between the containers & between them and the heated house area. At the top of the "T" is a thermal break and then another slab, which the house sits on. The heated slab is level with the unheated slab. The containers were placed first, and then the house built to the same height so that a single roof can span the entire area. In the left photo (above) the containers sit on piers and you can see the concrete slab between them and also extending toward the front where the house will sit. In the right photo, the mid floor between the containers has been constructed as well as the beginning of the house framing. Looking between the containers you can see the future back door between the house and the unheated container area.
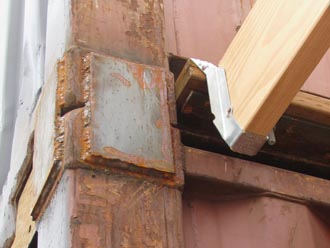
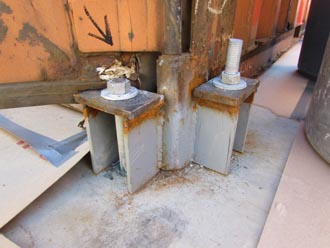
Working with containers often involves some custom metalwork. In the left photo (above), metal plates are welded across the gap between containers to attach them to each other. In addition, a long "L" bracket was welded across the top edge of the lower container and then a pressure treated 2x4 was bolted to that, and then the joists of the mid-level floor are then hung with joist hangers off that plate. In the right photo, custom "U" brackets are made of plate steel that is all welded to the container "foot". This "U" bracket then has a hole drilled in it, thru which passes the large piece of threaded rod, which itself was placed as an anchor bolt during the concrete pour.
The only holes put into the container structure were at the ends of three of the four container for small slider windows which were installed into the containers by the container supplier for a reasonable cost. The existing container doors were left functional and will continue to serve as access doors.
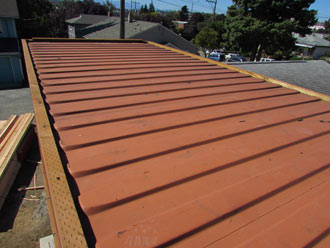
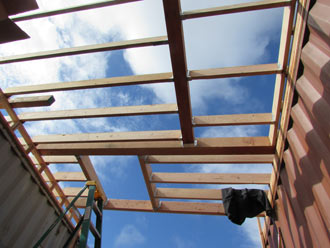
The roof, which is largely flat (1/4 in 12 slope) sits directly on the containers: first its sits on a pressure treated 2x4 screwed (with self-taping screws) into the container that acts like a top plate (see right photo, above). On the low side the rafter sit directly on this, and on other sides there are very short knee walls (on the side walls they're tapered), which are then nailed to the plate (see left photo, above). The gaps between the containers either have typical headers, or are just spanned by the rafters. The taper of the roof can be seen in the first photo in this section: the high side is on the right in the photo.

The photo at right is looking between the containers, toward the house. The door opening in the rear leads to the house, while the stairs goes to the upper workshop area. If you look carefully you can see that there is a gap between the containers and the house (notice the extra joists behind the stairwell opening). The joists in the near view (near the top of the stairs) sit on hangers, which as in the detail photo above, hang off a 2x4 which itself sits bolted to an "L" bracket that was welded in the gap between the containers. In this view it is also clear how the second floor also joins the entire structure together, even though much of it is unheated space.
Cost3
A container can be had from anywhere from nearly free to a few thousand dollars, with typical prices in the two to four thousand range (20' containers are obviously cheaper than 40' containers). You will also have to pay to have the container delivered, since they are very large and heavy, this will cost you anywhere from $100 to many hundreds of dollars depending on how far it has to travel and how difficult the site is to access. Containers are usually delivered by a roll-off truck which is only capable of dumping the container on the ground in whatever place they can back up to: if you need to move it elsewhere, or you want to stack them you will also need to hire a crane. In Seattle, cranes run $250/hr plus a setup charge, but obviously your cost may be very different.
In addition the cost of a delivered container, there will be costs to modify the containers (windows/doors/wall modifications), which obviously will vary depending on how many modifications you want. You may also need custom tie-downs if your location requires them. If you do the modifications on site, you will generally require the services of a professional welder, however many container companies can make these modifications for lower cost than can be done in the field.
Whether building with containers saves money or costs more will depend on many factors and the only sure way to determine if they're cost effective is to get price estimates for what you want and then comparing to the alternative (which in the US will generally be a wood framed structure).
Summary: Although containers are a huge potentially unused resource, using them for buildings is non-trivial, although its easier if the building is small and not used for living space. As they are used more frequently, standard methods of adopting them for building will likely develop which will reduce costs and hassle with building departments.
Notes
1: While this may not be technically correct, the idea is clearly the same in
that the side ties the top and bottom together so that the load on the bottom is
pulling on the side so that for the bottom to sag, the entire side must sag
also. In fact the more likely scenario is that the side is pulled out of
plane where it can then bend in a much weaker spot: the corrugations in the side
will fight it being pulled out of plane.
Or at least that's as best as I figure out what's going on.
2: This applies to all metal buildings, not just containers, so also metal framed buildings and and variation on metal agricultural buildings.
3: this costs are just ballpark and will vary widely from area to area.
4: maybe some day there will be rules of thumb like there are for wood construction, but for now your best best would be hire a structural engineer if you want to stack them in any way other than as they were designed to be stacked for shipping.
Resources
In case this article hasn't deterred you enough, here is another one with higher credibility: http://www.buildingscience.com/documents/insights/bsi078-ship-shape/?searchterm=luftwaffe