Rigid Board Skin
Rigid board skin walls have generally higher insulation values than double walls and use less lumber, but makes installing the siding more difficult (since foam won't hold screws or nails). If you want to install windows and doors on the outside of the rigid, you will need special additional framing around each of them. Rigid skin walls also have a generally lower potential for condensation inside the wall, which make them the system of choice for humid climates. Yet another advantage of a foam skin is that it can be retrofit onto older buildings.
The rigid board skin could be EPS, XPS, Polyiso or Rockwool Board (eg Roxul), and each have their advantages and disadvantages. Polyiso has the highest R-value and a low global warming potential, but is filled with potentially toxic flame retardants. XPS is very dense, but is filled with similar flame retardants, and currently is filled with gases that have a high global warming potential. Rockwool has a similar R-value to XPS, but a much smaller environmental footprint, so for some it is the preferable choice. The downsides are that its not very dense, is vapor permeable and absorbs much water; however none of these are deal breakers.
In the simplest case, the rigid layer is thin (less than 2'), and there are few complications. The more interesting cases is where two inches or more are added on top of either existing framing, new 2x6 advanced framing (example below), or a double wall1, as these create very highly insulated walls. Adding 4" of even R4/inch rigid add R16 to these walls, and adding 4" of polyiso adds R222, so a existing 2x4 wall filled with blown in insulation goes from R11 to either R27 or R33, an 2x6 wall goes from R15 to either R31 or R37, and R30 double wall to either R46 or R52 (but note that these combinations may have a greater condensation risk).
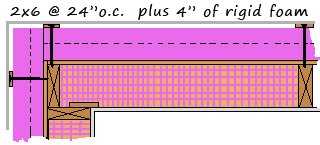
The example at left is a 2x6 advanced framed wall covered with two 2" layers of rigid insulation which are held in place by strapped, which itself is attached via long screws to the studs. The siding attaches to the strapping (in this case 2" strips of 1/2" ply) to form a rainscreen cavity. In this case the weather barrier is unspecified: it could be either above or below the rigid insulation.
The following sections address the issues in building these wall systems.
Attaching the Rigid
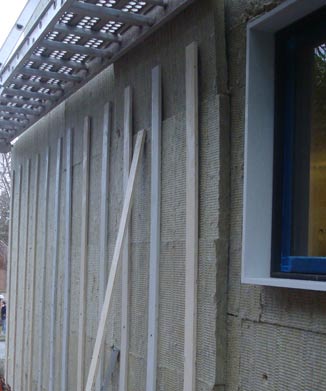
Up to 2" of rigid board can be attached with plastic cap nails, but beyond that, the only reasonable way is to use strapping of some sort, either 1/2 plywood strips or 1x material. If you're doing two layers, you can attach the first with the plastic cap nails and the second with the strapping: as you install each course of rigid board, you screw down the strapping--at least until the strapping is solid enough that subsequent courses will stay in place behind it. If you're using anything beside rockwool board, you can probably also use construction adhesive of some kind and then if you need strapping it can go on later.
If you're installing strapping, you need to decide whether it needs to be attached to the studs or whether it can be attached to the sheathing. This will depend mostly on the weight of the siding and the thickness of the sheathing. The specific issues of attaching siding to the strapping are below. While many choose treated lumber or cedar (ie a rot-resistant wood) for the strapping, chances are the strapping will stay fairly dry assuming the rainscreen functions well. Wood will tolerate frequent wettings if it dries out relatively rapidly. No matter where you put the weather barrier, the screws that hold the strapping on will penetrate it many times, so your weather barrier will be less than perfect using this method.3
In either case, the difficult issue isn't attaching the rigid board, its attaching everything else that goes around it, particularly when the thickness of the rigid goes over about 1½".
Installing the Weather Barrier
There are two options here: either the weather barrier goes under the rigid insulation, or it goes over it, although its a bit more complicated than that sounds. If the weather barrier goes under the insulation, you install it on top of the sheathing as you would if there was no exterior rigid insulation. This means that the windows and doors all go in the plane of the sheathing, and hence will end up recessed after the rigid and siding go on. If you want to put the weather barrier behind the rigid but put the windows in front of it, its possible but you'll have a more complex windows install and more complex flashing around it (more on this later).
If you want to put the weather barrier in front of the rigid, then the easiest way is to just tape the joints of the rigid insulation and let the rigid be the weather barrier. If the layer of insulation is less than 2" you could potentially install weather barrier fabric (ie tar paper, tyvek, etc) on top of the rigid using plastic cap nails, but you still have to make sure that you won't run into any issues installing flashing. There appears to be no reason you couldn't hold that weather barrier fabric on with the strapping, but there is no obvious way to hold it in place until the strapping is installed. Since there is no easy way to tape rockwool boards, the only option for a weather barrier on the outside is to use fabric, or of course to not put the weather barrier on the outside.
In all cases the weather barrier ends up with a lot of holes in it4: either its filled with nail holes from attaching the siding, or filled with screw holes from attaching the strapping. There is nothing really different about this in rigid exterior walls other than nails are often replaced by screws, but it worth keeping in mind that because of this weather barriers are typically not perfect.
Installing the Siding
In the simplest form, with only 1" to 1½" of rigid board, the siding can be nailed on using longer than normal nails. Exactly how much rigid you can put on will depend largely on what siding is chosen, and whether you can find an appropriate long fastener. The plus side to this method is that its fairly simple to do; the downside is that's it's not much additional insulation, which means that in most situations it won't eliminate much of the potential for condensation. You also don't get a rainscreen, which in drier climates is no big deal.
If the rigid is too thick to nail the siding directly thru, or if you want a rainscreen, you will attach the siding to the strapping, or on clips if anyone ever comes out with one for residential siding.
The key to attaching the strapping to the siding is that the siding is plumb, which is fairly easy to achieve with all rigid boards except rockwool, which compresses very easily. If the strapping is attached to studs, then verify that the spacing of the strapping meet the minimum requirement of the spacing of fasteners for the siding, eg siding that requires nails with 16" spacing won't work on studs with 24" spacing.
Rockwool: screw issue use wide strapping. Details TBD. You can avoid the squish problem by using squash blocks, although this will require significant labor. One simple method is to drill cores out the the rockwool, install sections of plastic pipe cut to the right length, then stuff the pipe with the removed rockwool core. The strapping now is prevented from compressing the rockwool. Since plastic pipe isn't exactly environmentally nice, there are probably other ways of doing the equivalent with better materials.
Clips The alternative to is potentially another solution for rockwool, which is to use clips similar to what are used in curtainwall systems on large buildings for example see the cascadia clip. No clip is currently made for residential applications, but if one were, the general idea is that it is "I" shaped, where the rockwool board fits in the cavity of the "I". If the clips are to attach to the studs, the spacing of the studs must be the same as the width of the rockwool boards, and the siding must also be able to span that far between fasteners.
Siding Corners: because the outside corners are now all rigid insulation, none of which will hold screws, attaching the corners of the siding becomes progressively more difficult as the rigid insulation gets thicker. If you're using stiff enough wood siding, you can just attach the boards from one wall to the other, and then the two sides support each other. If you're using a floppy siding (eg fiber cement), or one that you can't attach one side to the other, then you will need to find a way to attach corner boards.
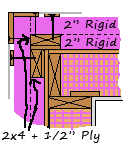
In the diagram at the top of this page, you can easily see the corner attachment issue. The diagram at right is a modification where extra lumber has been added to the corner (replacing the lower course of rigid insulation); this extra lumber provides a place to attach the corner boards (which are typically 1x4). If the insulation is rockwool, you still have the compression problem. In order to keep the siding from sticking out beyond the corner boards, you'd either need to use 3/8" battens, or corner boards thicker than 3/4". The general idea is to sacrifice some insulation so that you have a more accessible surface to attach to: in this case 2x4s are padded with 1/2" ply (so they fully replace the first 2" course of insulation). The corner pieces are then attached to these blocks.
Stucco siding is a challenge because its not obvious how to attach the wire other than on battens, but its not clear that stucco sitting over a rainscreen gap would be very durable and if you don't put in the gap then you probably want to be in a dry climate. Details TBD.
Installing Windows
In general, the windows will be installed in the same plane as the weather barrier because the windows are actually part of the weather barrier so they must integrate with it. It is possible for the windows to be in a different plane than the weather barrier, but the transition area then becomes part of the weather barrier also: the barrier becomes like a sheet of plastic with a square dimple in it. If you do put the windows in a different plane than the weather barrier, make sure the transition area doesn't have a place where water can pool, ie an surface parallel to the ground probably should have a slight slope on it.
Everything behind the rigid: in this case you install windows, doors and the weather barrier the exact same way you do with traditional framed walls, then install the foam & siding on top of that. This is the easiest to do because there is the least to learn.
Everything in front of the rigid: there are two variations here: if you're using a kind of rigid that you can tape to (ie XPS, foil faced Polyiso), and that rigid insulation is dense enough to hold the weight of the windows (XPS and only maybe Polyiso) then the window can be attached directly thru the rigid insulation, and then taped to it.
In all other cases you will need to build bucks for the windows. The bucks are boxes that attach to the framing and span the entire wall thickness so they are cantilevered out over the rigid. The window is then attached to the buck. The buck could be just plywood, but then you won't be able to nail the flanges, since even if you could nail into the end grain, the nail won't hold very well. Instead use metal clips screwed to the window frame itself, then into the side of the plywood. For photos, see this on Building Science Corp website. The only other option is windows without flanges installed with stops, which would make for somewhat more difficult water and air sealing5.
The other options to make the buck is either to make it out of beefier material (eg 2x), or to attached a 2x2 frame to the outside edge of the buck, or potentially to just make a frame of 2x2 and screw it into the framing over the bottom layer of rigid just like you screw in the strapping (if you're using rockwool, you may want to consider using a strip of something more rigid underneath this frame.
If you make the buck out of beefier material, you'll have a bigger thermal bridge and a lower whole wall R-value. If you use the 2x2 solution you'll have a lower R-value, but no bridge. For additional strength, the 2x2 can also be screwed into the framing the same way the strapping is. in either case you now have enough material to attach the flange, and also a surface to attach the flashing tape to.
Weather Barrier behind, windows in front: in this case you will be building windows bucks (with all the same options as above), and the weather barrier will run along the outside of the buck and then under the window's nailing flange.
Summary: You can get much higher whole wall R-values than any single wall system, and if you add enough rigid, you reduce the condensing potential as well. Another advantage is that you can retrofit a rigid skin onto an existing building. The downside is that easier to use materials (XPS, Polyiso) have a somewhat large environmental footprint, and although Rockwool board has a lower environmental footprint, but may be harder to work with due to its lower density and lack of strength. Exterior rigid skin walls are more tricky to implement than plain advanced framing, and in many cases more complex than double walls. The largest difficulty is attaching things, particularly when the rigid skin is fairly thick.
Notes
1: Keep in mind that in order to keep the condensing potential of the wall low, then as the framed wall gets thicker, the exterior rigid insulation must also be thicker in order to keep the back side of the sheathing/rigid above the dew point. If you're putting the sheathing on the interior or using a vapor permeable rigid, or any other technique to eliminate this condensing surface, then this consideration doesn't apply to you.
2: I'm using conservative R-value here, not the generally overstated ones.
3: I could find no data on this so apparently no one else is worried about it.
4: this entire paragraph is probably irrelevant, but I'm leaving it in for now because the impact of fasteners on everything seems to be unevaluated.
5: it may not be that difficult, but since its not the standard configuration, you'll have to figure it out yourself.