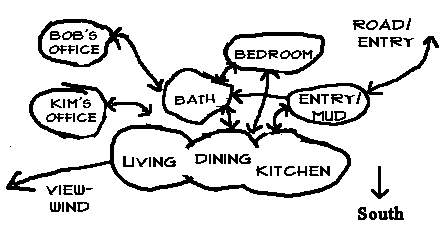
Bubble Diagram
 Once
the room list is known, begin placing the rooms on the site in their preferred
direction (ie NE, S, SE etc) by drawing them on paper as if drawing a map (ie
the bottom of the page is south). Then draw the required flow between the room
with arrows. Rooms whose orientation isn't critical can float anywhere,
and rooms that must be together should be drawn as one. When done, we have
a drawing of how every room related to the site and too each other.
In the example (above right), the living/dining/kitchen is intended to be one room, so they're drawn as one big connected area, and since the intent is for them to be on the south side, they're at the bottom of the diagram. The bedroom is shown its desired northeast location, the entry on the east because the road is there. The bathroom is shown at the junction of the bedroom, entry and dining/kitchen area because it must be easy access from all three. The two offices are floating in the remaining space because they're orientation was less critical in this example.
There will typically be conflicts at this stage: two rooms want the same location, or maybe two rooms want to be adjacent, but they're preferred orientations that don't allow that. Tradeoffs will have to be made at this point, until every room is placed, connected to which rooms it needs to be connected to and oriented on the site the way it wants to be.
As a general rule public spaces face the sun (south) because they are the spaces occupied during the day and so demand both light and heat, while private, especially bedroom require less heat and light, but want more are more noise sensitive. Keep in mind that this isn't always the case, and that sometimes a northern exposure may be preferable, like for an art studio, reading room or home office. By nature, buildings have variations of light, with some being bright and others more softly lit, so match the light need with the location in the building. Luckily, spaces requiring the most privacy usually are also better with soft light.
