Double Walls, Truss Walls, I-joist Walls
The general idea behind these walls systems is to built a much thicker wall to allow for much higher insulation values but still using the standard thin wall (2x4), or smaller lumber. In each case, the exterior siding hangs on one wall, and the interior wall board hangs on the other and one wall or the other carries the load and there is a gap between the two walls. If there were no gap the wall would be no better than the equivalent 2x6, 2x8 or 2x10 wall, because the major advantage of double walls over single walls is elimination of thermal bridges. The difference between truss walls and double walls is that in truss walls, the two studs are joined together with gussets into a single unit, either because the outer wall is cantilevered out, or because the studs are thin. I-joist walls are just a variation on truss walls, but in this case the OSB web is like a continuous gusset and its made in a factory instead of being built on-site. Note that you could use steel studs in these walls, but because steel studs typically significantly reduce the effective R-value of the wall, and the major motivation for these walls is a high R-value, steel studs generally don't make sense.
There are those that argue that double walls reduce the floor space of the building, but unless you're retrofitting a double wall into an existing house, thinking of the walls as taking up floor space is the wrong way to look at it. Any thick wall will take up more space than a thin wall--the differences between them have to do with where the load bearing part of the walls is. If you're up against your zoning setback, whether the thickness is outside of the load baring wall or inside doesn't matter--you get the same interior space either way. It is true however that rigid insulation has a greater R-value per inch, so a rigid skin wall can be slightly thinner than a double wall for the same overall R-value, but in most cases the choice between the two isn't based on whether you can get another couple of inches of interior space, but on the relative environmental concerns, costs, durability and ease of building. It also true that it the exterior wall is load bearing, your foundation footprint will be a few inches bigger than if the interior wall is load bearing.
There are also claims that double walls use twice as much lumber or cost twice as much to frame, and these are blatantly false. It is true that there are almost twice as many studs in the exterior walls, but floor joists, roof rafters, sub floors, sheathing and interior partition wall lumber stays the same, so the total increase in lumber isn't really that large. Likewise, overall framing cost does not go up that much. The cost of insulation itself goes up because the wall is thicker, but the labor cost doesn't go up much (one catch though: if you were thinking you could do damp spray cellulose in thick walls, you should use the fabric instead which can increase cost). Depending on the type of window and door trim, there is additional cost for wider trim also. If you use 24" spacing, you will need to use 5/8" drywall instead of 1/2", but you're probably saving much more lumber than the extra gypsum use.
Double Walls
This approach is simple to adapt because it means learning very little new: first build a 2x4 framed house, and then go back and add another non-load bearing wall on the inside. It is also possible to make the interior wall load bearing and the outer one not, its conceptually the same,and the two are not that different other than in the framing details.
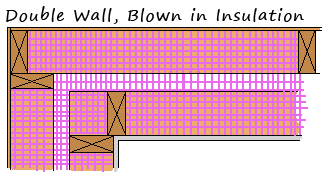
Of course, its not as straightforward as it sounds: window sills and liners have to be wide, you typically (but not always-it depend on local code) need to install fire breaks every ten feet (small sheets of plywood nailed across the two studs), and you may have to be careful about how the inner wall is attached to the ceiling to avoid cracking sheetrock. That said, windows and doors mount in the exterior wall just like normal, and as long as the wall cavity is greater than the thickness of two studs, there are no thermal bridging issues. You can use ungraded reclaimed studs, finger jointed studs or even 2x3s1 on the interior wall because its not load bearing. And of course you can do 24" spacing on the interior walls as well, provided that your wallboard can handle it (ie if you're using gypsum, you will need to use 5/8" instead of 1/2").
If you make the inner wall load bearing, and the house is two story, you can avoid a small amount of thermal bridging at the rim joists by terminating all the second floor framing at the inner wall. The outer wall can then be balloon framed, although you will need some connection to the interior walls to provide stiffness. For an example of this, search for "Riversong truss".
If you stagger the studs (ie so that the inner wall stud isn't in line with the outer wall), the overall R-value of the wall is a bit higher, but generally not that much higher--typically its only a couple of percent, so most builders ignore this. That said, they tend to get staggered anyhow because the inner wall starts at an offset to the outer wall (see diagram above). Of course windows and doors will require studs to be aligned so that limits the effectiveness of offsetting. You just ignore the whole issue, but it makes sense to at least make sure the framer understands that lining them up is a slight disadvantage.
There are various ways to frame a double wall. The easiest way is to frame the inner wall is right after the outer wall, but before any roof/ceiling framing is installed. You can also install it after the ceiling is in, either by framing it in place or building it on the floor just a little bit smaller than the ceiling height and pounding it into place--when you tilt the wall up, its so close to vertical when it starts hitting the ceiling, that it's height is always less than 1/8" extra, so if you make it 1/16 short it easy to pound in. Finally you can frame both walls on the floor at the same time--the disadvantage is that its twice as heavy to tilt up into place, and the attachment of the two walls will result in thermal bridges, especially for example if you use large dimension (say 2x10) top and bottom plates.
The main difference in framing a double wall versus a single is at corners and intersections. In the outer wall for both inside and outside corners, nothing will be attached to the inside of that wall, so a 2 stud corner is fine. Likewise for inner walls, nothing is attached to the outside of the wall, so 2 stud corners are also Ok. At intersections, the same techniques for advanced framing are used (see here).
The greatest concern for double wall is accumulated moisture and/or condensation inside the wall cavity. To avoid this, much greater care must be made in air sealing (since that's the major source of moisture)--in fact fanatically sealed would seem to be a requirement. Ideally the wall should have some way to dry out when the inevitable small amount of moisture gets (for example due to an imperfect vapor barrier). In cold climates this would mean some kind of vapor permeable sheathing, but since neither plywood nor OSB are very permeable (especiallyOSB), any home whose shear loads require full plywood sheathing will be stuck with either very slow drying to the exterior or drying to the inside in the summer.2
As a solution to this "cold sheathing" problem, some have suggested putting the structural sheathing on the inside and use a vapor permeable fiber board on the exterior, but this configuration has it own set of problems. First, structural sheathing needs to go on the load bearing wall, and second permeable fiber board is not widely available, and even it is, it may not be a good choice for exterior exposure since its tends to rot easily. In areas where you don't need full exterior sheathing, you can skip the sheathing and just install housewrap (all of which is permeable), but now you only have housewrap holding your insulation in, so whether this is a good option depends on whether you perceive longevity issues with omitting the sheathing.
Another way to look at it is that "cold sheathing is only a problem if moisture gets thru, and since most moisture migration is due to air movement, so if you eliminate air movement thru the walls, you probably eliminate the problem, especially if the wall cavity has the ability to absorb some moisture movement for example, a cavity filled with cellulose). Needless to say, the longer the cold winter (ie more time for moisture to move), the larger the temperature difference across the wall (ie more drive to move moisture), and the higher the indoor relative humidity is (more available moisture to move), the greater the risk. With a long enough winter and enough indoor humidity, vapor can still be a problem.
Summary: In some ways, double wall framing is easier than advanced framing because if you use a few extra studs, the overall R-value stays pretty high, and hence you don't need to worry about ladder blocking or exactly how you frame corners because there is always a gap between the two walls. Because rigid foam is avoided, it is possible to use all environmentally preferred materials, but the downside is that without the foam, the possibility of condensation in the wall goes up.3
Truss Walls
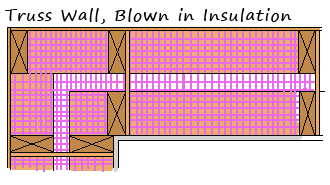
Truss walls are just like double walls, but the two walls are tied together with gussets. The general reason to do this is because the outer wall is cantilevered out beyond the edge of the foundation: there may be just air underneath the cantilever, or there maybe some kind of rigid board insulation on the outside of the foundation. Both walls can be made of 2x4s, or the non-load bearing wall can be a smaller dimension.
While there is nothing saying that the truss has be cantilevered, but putting the whole thing on a foundation defeats the truss nature of the wall, ie the gussets so tightly bind the two walls together that they act as one wide board, a property that is unnecessary if both walls are structurally supported. In this case you could potentially eliminate most of the gussets since all they would be doing is stiffening the thinner stud. This would then be really a double wall with thin non-load bearing studs stiffened by gussets. Note this will only likely increase the wall R-value and decrease the wood use if you can use only very few gussets and other framing factors make this change inconsequential in the end.
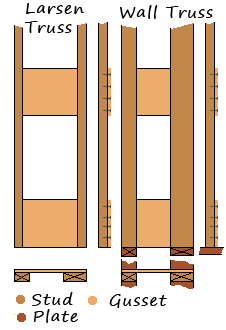
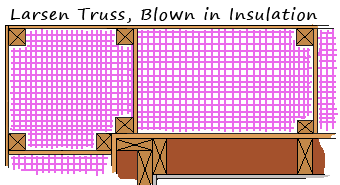
There are two broad categories of truss walls: those where some part of the truss is load bearing, and those that carry no load other than the weight of siding/windows etc that are attached directly to them. Load bearing trusses are called wall trusses, and non-load bearing ones are Larsen trusses4. The name Larsen truss is after John Larsen who built a very specific type of non-load bearing truss, but the name now refers to any non-load bearing truss, most of which are just variations on Larsen's theme. Larsen trusses are generally made with very small dimension lumber (2x2s) and are attached to a separate load bearing wall, often one that already exists.
The example (above, right) shows three views5 of two different 12" wide trusses, on the left is a Larsen truss, and on the right a wall truss. The Larsen truss is made from 2x2s and 8"x12" plywood gussets, in this case shown as attached on the outside instead of via a center dado. The wall truss is made with a load bearing 2x4 and a non-load bearing 2x3, and the same gusset configuration. In this case there is also bottom plates attached to both walls of the truss.
Insulation: Both types of trusses can be filled with a variety of insulations, the most common of which are fiberglass batts, blown in fiberglass and blown in cellulose. If you're going to blow in insulation, many builders find that putting a layer of mesh fabric on the trusses keep insulation from drifting from one bay to the next and hence a more reliably even fill of each cavity.
Installing the gussets: the gussets can be attached via a center dado on each stud and glued in with exterior glue (this was Larsen's method and the result is like an I-joist with gaps in the web), or they can be attached on one surface and glued, nailed, screwed or some combination of those (this is the more common method because its less labor). Using the dado, the gussets don't add an thickness to the truss, and hence stay out of the way, wile attaching the gussets to the surface add some thickness. Gussets can be as thin as 3/8", but could also be made of scrap 3/4". A typically height is 8" to 12", and if they are attached on the outside the gusset usually spans the width of the wall, which itself is typically 8 to 12" wide. You will generally end up with five gussets per truss, although you may be able to eliminate the top and bottom gusset if there is going to be some other attachment that will be equally strong, for example if the truss is attached to the soffit you might be able to leave out the upper gusset.
Assuming you're making quite of few of these, you likely want to make a jig that holds all the pieces in place so you can make them rapidly.
Windows & Doors: most builders frame window & door opening in plywood although that may not be necessary given that the opening will be lined with something eventually anyhow, however if you're using blown-in insulation you will need to seal the opening somehow (typically with mesh fabric) before installing the insulation.
Wall Trusses
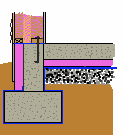
Truss wall on a exterior insulated slab. (Insulation is dark pink area)
Of the two options, wall trusses are the most similar to double walls, the big difference being the cantilever, for example to align the outside of the wall with the outside of exterior rigid insulation on the foundation/slab (see diagram at right). With wall trusses, the inner wall carries the load and all the outer wall carries is the weight of the siding and windows.
Because the inner wall carries the load, the sheathing generally goes on that wall and typically it goes on the inside, right under the wallboard because both plywood and OSB are only semi vapor permeable. In cold climates this may be a better wall from the moisture perspective because it puts the sheathing (which is typically not especially vapor permeable) on the warm side of the wall, where it belongs. However in a climate with a significant cooling load there is now a vapor barrier on the "wrong" side, so it may not be appropriate for those climates. If you're going to go this route, even in a cold climate, you probably want to keep your utilities in chases that allow the wall to stay air sealed. For more on wall moisture issues, see the moisture section.
This wall system has been used on a couple of passive house projects in the northwest.
Framing the non-load bearing wall
Although the diagram (above, right) shows a bottom plate on the non-load bearing outer wall, its not really necessary. If you're going to frame the inner wall first, then come back and attach the outer wall on, then putting a plate on the outer wall would be awkward at best. Alternatively if you build whole trusses, you'll probably want to assemble the whole double wall on the floor and tilt it up in one piece. In either case a bottom plate on the outer wall would keep the individual trusses in place until sheathing/siding was put on.
Outside corners present a dilemma in that no truss will end up at the corner, and there is nothing to support a stud there. However, assuming you are going to put some kind of sheathing on the outer wall, the span between the outside corner and the adjacent truss is short enough that just attaching one piece of sheathing to the other will create a plenty stiff corner. While its a bit awkward, attach 2x2 (or larger if you want) to the sheathing on one side, the when you install the other side, nail the two together. Needless to say, you'll need some way of holding the two sides in place while you nail them together.
The other alternative is that if you frame the truss walls on the floor as a unit and then tilt them up, you can frame the corner as if it was going to be supported (diagram above), and then just nail the two walls together.
Larsen Trusses
With Larsen trusses, an inner load bearing wall is constructed first (or in the retrofit case already exists), and sheathing attached to it and then the trusses are attached to the sheathing. In this way its almost a triple wall system in that there are 3 layers of "studs" in a wall section. If Larsen trusses are being used for a retrofit, it is possible to install them right over the old siding. In either case you want to nail them thru the inner wall sheathing into a stud, so that all three studs will always be lined up.
Once installed on the wall, Larsen trusses are very strong in the up-down direction--so strong you can climb them like a ladder. However until the outer wall studs are attached to each other, each truss can move like a door in the left-right direction. Even after assembly, not much keeps them from folding (mostly their attachment to other walls perpendicular to them), so even if you were to install structural sheathing out there it won't provide much structure, but it only needs to hold the siding and windows.
Assuming you use 2x2's a Larsen truss uses only slightly more lumber than a double wall in that one of the 2x4s in the double wall is replaced with two 2x2s connected by gussets, so the extra lumber is only in the gussets. Alas, unless you want to hold the insulation in with just housewrap, you will probably end up installing a second layer of sheathing, although this layer is non-structural.
With Larsen trusses, the sheathing is on the exterior of the inner wall, which means that its more toward the inside of the house than outside, which means that these walls should have few problems in cold climates, but may have moisture problems in climates with significant summer heating loads. Many builders put a layer of poly sheeting on top of the inner wall sheathing (or existing siding) before attaching the Larsen trusses, and in that case there is obviously no inward drying potential for the truss portion of the insulation at all. It does however mean that you no longer have to worry about air sealing around utility penetrations, since they're all behind the Sheathing/poly layer. For more on this, see the moisture section. You can either insulate the inner wall or leave it un-insulated, its isolated from the truss part assume the trusses are thick enough, the inside of the sheathing is always above the dew point.
Framing issues
One difficulty with this system is that 2x2s tend to warp and twist, so you want to beware of getting them wet or any other causes of wood movement. The advice is to install the trusses as soon as you make them so they don't have time to move.
Framing outside corners involved nailing two somewhat floppy walls together. As with wall trusses, if you use top and bottom plates of some sort, you can them long with a single stud on the outside, then nail the two studs together when the wall it tilted up. Otherwise you're going to nail a 2x onto the edge of the sheathing that goes on one side of the corner, then nail the sheathing on the other side to it.
Larsen trusses are generally fully cantilevered out beyond the foundation so that the bottom of the wall has to be boxed in, typically with plywood (possibly then covered with something more durable). You will likely want to install something that functions like a bottom place on both the inner and outer studs of the truss or otherwise you have only the relatively weak end grain of the 2x2 to attach this bottom piece of plywood to. This plywood bottom will generally be strong enough so that you can eliminate the lower gusset.
For more detail on Larsen trusses, see: http://www.greenbuildingadvisor.com/blogs/dept/musings/all-about-larsen-trusses
Summary: Truss wall framing is different enough from standard framing that there is a learning curve and there is enough extra details that even with experience it's probably more labor than double walls. For a remodel however, Larsen trusses provide an option to rigid insulation. Moisture control in cold climates may be better with truss walls than with exterior load bearing double walls, but since air movement is the main problem, the different may be minimal. As with double walls, there may be moisture problems, particularly if air sealing detailing isn't done right.
I-Joist walls
I-joists can be used as Larsen trusses (but with more thermal bridging), but some have also built walls out of I-joists by themselves. In fact I-joists are really just trusses with a solid web instead of partial one. The main advantage is that they're factory made; the disadvantage is that by themselves they can't bear any load, and since have a full web, there is more thermal bridging than with a site built truss. There is another odd advantage in that a wall made from engineered lumber is more likely to be very straight (no environmental benefit, but it would make installing cabinets & trim much easier!).
Since I-joists are floppy, you need to use other material (standard 2x material or something like an LVL if you want to stay with engineered lumber) for any kind of point load posts like where you'd use king studs, and typically you will have put structural sheathing on BOTH sides of the wall, which increases lumber use and makes for a wall which is less likely to dry should it get damp inside.
I-joist walls have been used primarily by the Passive House community in the US.
Notes
1: but alas 2x3 are often of low quality and they don't make as stiff of a wall. You could get around the quality issue by buying 2x6s and ripping them, but this is not likely to be cost-effective.
2: the longer the winter, and the higher the indoor humidity the more double walls are at risk for condensation failure. There is some evidence that the degree of the problem is not as bad as modeling would indicate, at least as long as indoor humidity is kept to the low side of comfort (like 30-35%). The thought is that wood framing absorbs moisture for some part of the winter, and if you have cellulose insulation it also absorbs some, and maybe the borates in the cellulose partially leach into the surface of the sheathing. See buildingscience.com for article BA-1501, https://buildingscience.com/sites/default/files/migrate/pdf/BA-1501_Monitoring_Double_Stud_Moisture_Conditions_Northeast.pdf
Note that in the Pacific Northwest, winter outdoor temperatures are much warmer than most of the eastern US, and hence indoor humilities can be expected to be higher, but the wall is also not as cold.
3: condensation only really a problem with air-filled insulation: using non permeable spray foam would solve the problem--but even closed cell polyurethane is somewhat permeable (in addition, spray foam sticks so hard to the studs, that it makes them nearly impossible to reuse).
4. As far as I know there is no official definition, and often any kind of truss is called a Larsen truss. Given that Larsen's original trusses were non-load bearing, and the two framing methods are different enough, this nomenclature seems reasonable. Its unfortunate that the load bearing version is called a bearing truss or some other name, since the name wall truss also implies, well, a truss that makes a wall, not necessarily a load bearing one.
5. the views are the standard mechanical drawing ones: front, side and top.