Slab on Grade
Slab on grade construction is often lower cost than either a crawlspace or basement and has the advantage providing thermal mass, but at the expense of losing basement storage space and higher concrete costs. As a result, most slab on grade homes have somewhat larger footprints, and often require an external shed or garage to provide the equivalent storage space. In cold climates, slabs will have more similar costs to crawlspaces unless you do a frost protected footing1 - otherwise your footing must go below the frost line so you end up with a wall a deep as a crawlspace anyhow.
The top of a slab should always be at least 6" above the ground (and code now requires 8" in some areas). This keeps both groundwater and rain away from your walls. If you're going to put in amended garden soil after construction, you should account for the thickness of the soil in this determining slab height, or be prepared to remove the unwanted soil before installing the better soil. In addition the soil should slope away from the house, generally at about 6" per 10' (ie a 5% grade), but obviously any slope is better than no slope.
Like foundations, slabs generally require some kind of footing underneath all load-bearing walls. This can be done either by building a separate footing/stem wall or just thickening the slab where needed ("mono pour"). The two are fairly different. General info about footings is on the basement page.

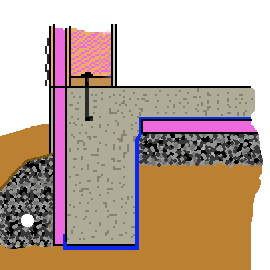
Mono-pour: solid pink is rigid insulation
blue is water barrier. Slab sits on coarse
rock, and a similar rock is used for a
perimeter drain, which has a drain pipe in
it. This footing sits on native soil, so either
it needs to extend below the frost line,
or be placed on very well drained soil.
The mono-pour is the easiest and cheapest method (due to less labor) Typically all you do is excavate additional dirt where the footings need to be while the form that defines the slab is only above ground--the excavated hole serves as the form for the footing (meaning that the actually footing is often a bit larger and far more ragged than is shown on drawings).
In this method you are forced to put the vertical portion of the insulation on the exterior, although if properly supported, it can serve as the form work for the slab (the easy method is to just use normal forms whose position is offset by the thickness of the foam. The exterior insulation must be protected from the sun, physical damage and termites, and if not part of an exterior insulation system (ie how its shown in the drawing at right), will need Z flashing above it, since it will stick out beyond the wall. Typical protection for the insulation is either a roll of metal flashing, or cement board.
While typically XPS insulation is used below grade, the vertical insulation has very little force on it, so you could use EPS or even Rock wool boards, but Rock Wool is very vapor permeable and not very strong, so you will likely want to damp-proof the footing and protect the entire section of insulation. Above grade any insulation will work, or for that matter even nailbase (SIP with OSB on only one side) or a truss wall--however the joint between the two must be flashed or otherwise covered so it doesn't leak.
On the plus side, if you're bjuilding in a cold place, you're far along the way toward building a shallow frost protected foundation. However, note that the standard method leaves a cold bridge thru the bottom of the footing. While XPS insulation typically has enough compressive strength to sit under the footing, its not traditionally done, so expect resisitance from code officials. However most buildings don't exceed the 25psi compressive strength of XPS, so at least some builders have put it under the footing.

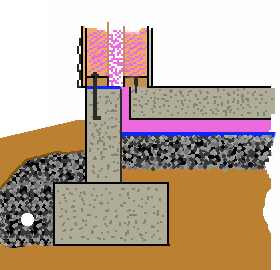
Stem wall: vertical insulation moved to the
exterior. A capillary break is no needed
under the exterior wall. The vapor barrier
under the slab is shown also under the
insulation, but ideally its above it so that its
easy to verify that there aren't puddles of
rainwater sitting on it before the slab pour.
Building a stem wall on top of the footing allows the insulation to be placed on the interior, where its fully protected. Excavation and form work start just like a mono-pour, but a second form is added 6" or so inside the first one, and that defines the stem wall. As before, the easy method is that the footing part is formed only by the dirt hole. Here, the footing and stem wall are usually done as one pour, then the interior gravel, insulation and vapor barrier are added, and the slab itself is done as a second pour.
While it is desirable to keep the thickness of the stem wall to a minimum (to leave room for insulation), in practice getting much thinner than 6" is difficult even though the area of concrete that carries the load is usually strong enough--for example a 1000SF building that has a 40lb dead load, a 20lb live load, and 40lb snow load would weigh 100k lbs, and that sitting on a 6" wide 130' length foundation (ie 65SF) would result in 1500lb/SF or 11psi--far less than the 2500psi of the concrete. The issue is more that as it gets thinner, its more prone to bending forces, which are carried only by the rebar inside, and the rebar relies on being surrounded by concrete...so often the limition is that code requires the rebar to be surrounded by 3" of concrete.
The stem wall method has the advantage that there are no cold bridges, but does not also work as a frost protected foundation, so in that case, insulation will need to be added to the exterior also-as long as the interior insulation is not large, you can use the amount of exterior insulation given in the frost protected foundation guidelines for your climate.
The limitation of the stem wall approach is that its hard to fit much vertical insulation because the minimum thickness of the stem wall is around 6" and whatever insulation is inside that, needs to be covered either by more wall (for example in a double wall) or by finish material (eg wood, tile, carpet etc). If covered by a double wall, this inner wall can't be load bearing, and needs to attach somewhere--so either you need to leave enough concrete to attach it via masonry screws to the slab, or gusset the inner wall to the outer (with a small thermal bridge penalty), or use a wide bottom plate (eg 2x10 or 2x12), but this has a larger thermal bridge penaltly. If you cover the foam with flooring, the flooring will either need to glue to it, or attach elsewhere. If you don't want to cover the slab, for example if you're doing acid stain, you can cut the top of the insulation at a 45 bevel--that leaves only a small thin edge showing that you can cover with baseboard--but at the cost of somewhat of a thermal bridge thru the thinned insulation.
How much insulation?
Many slab on grade buildings, particularly those with a mild winter, have little or no sub-slab insulation. In the ones that do have insulation, it is usually only 2-4 feet run around the perimeter ("perimeter insulation"), and it at most 2" thick. While the perimeter is the chief pathway for slab heat loss, data now suggests that as we insulate the rest of the building more, heat loss thru the middle of the slab can be significant. Full slab insulation is imperative in cold climates, as well as for any heated slab, even if the heat is just passive solar. In hot climates, full slab insulation is undesirable--perimeter insulation will keep the heat out while leaving the additional somewhat cool thermal mass of the ground to help keep the building cool.
Full slab insulation will reduce the chance of condensation on the cold slab, as well as raise the mean radiant temperature of the room. This would be more of an issue in cold climates, although slabs are less typical in those climates.
If you're building a low-energy house, you might want to consider very high levels of insulation under the slab and at the perimeter, ie R30 or more, although it is often physically difficult to fit more than 2" of vertical insulation. Those doing Passive House will end up there anyhow, and for everyone else its a matter of what makes sense economically.
For a slab with in-floor heat, or a passive solar slab, full insulation to at least R10 is a must. Obviously areas with warmer earth temperatures need less insulation (but they also have less need for in-floor heat).
Ground temperatures: the temperature of the ground more than ten feet deep is fairly constant at around the average seasonal temperature of the area (a bit warmer in summer and a bit cooler in winter), although this could vary if there is significant ground water movement. As you get closer to the surface, the temperature is closer to the daily temperature average. Since a slab protects the soil under it from those temperature extremes, the center of a slab will tend to stay at a more constant temperature, while the perimeter is exposed to the seasonal temperature extremes. Deep soil temperature in the mid section of the continental US runs in the low to mid 50s.
Frost protected shallow foundations

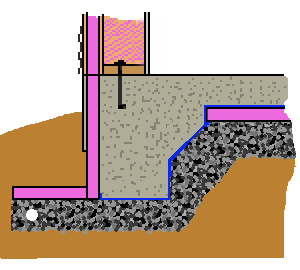
Generic frost protected shallow monolithic
slab. The depth of the footing, the R-value
of the vertical insulation, and requirements
for the horizontal insulation are all taken
from a table.
The other reason to insulate a slab is so that the footing part doesn't have to go all the way down below the frost line (which could easily be 4' or deeper for those of you living in the north.) The idea here is that if you insulate the slab on the exterior, the warmth coming from the deep ground and leaking from the building will keep the underside of the foundation from freezing. The entire assembly is also put in fast draining soil or rock so that if the temperature did hit freezing, there is no water to freeze.
A typical foundation is designed to be two feet high to match the readily available rigid insulation sizes--typically 8" sits above grade, and 16" below grade. The horizontal wing is only required in the coldest climates--when it is required it means you should protect if from above, given that it sits only 12-16" below the surface-for example with pavers, flagstone etc. Also, the soil above the wing insultion should drain well, and ideallly the wing insulation should slope away from the building as the same slope at the surface--ie around 5%.
There are extensive guides to frost protected foundations on the web--for example search for "Revised Guide to Frost Protected Shallow Foundations". It was produced by NAHB in 2004.
Vapor Barrier
Slabs should be installed on 6 mil (or thicker) polyethylene sheet "visqueen" (or equivalent vapor barrier) on top of coarse gravel (no fines). The gravel acts as a capillary break, keeping water out, and the plastic keeps most of that limited moisture from migrating thru the slab. This moisture barrier needs to be continuous along the entire contact surface between the slab and the ground, but since it is a vapor barrier/capillary break, it does not need to be perfect: a vapor barrier that is 99% intact will also be 99% effective.
For a mono pour slab, the vapor barrier really ought to go under the footing as well, but thats not commonly done. XPS insulation is actually a reasonable vapor barrier-at least as long as not too much is asked of it. In either case, the vapor barrier should sit on top of the insulation--but only so that you can verify there aren't concealed puddles under the insulation--otherwise the vapor barrier could equally well go under the insulation.
In addition to putting a sheet of plastic under the slab, an additional vapor barrier can be installed on the exterior of the slab using any of the typical spray-on, roll-on, or brush-on coatings used for foundations
Slab curling

When a slab cures at an uneven rate (due to the surface drying), the slab may curl at the edge resulting in an uneven surface. As shown in the photo at right, builders (particularly in California) put wet sand under the slab. Given that (or assuming it anyhow) there is a vapor barrier under the slab, all that mositure will eventually come up thru the slab, and it could take quite a while for it to do it, which has resulted in some bad things happening to finish floors not long after they are installed. The better solution is to use the right concrete (not too wet) and to keep the new slab fairly wet for the first couple days of curing (wet burlap, sprinklers or whatever works) and then pour right over the vapor barrier.
Adobe
Fundamentally adobe is similar to concrete, but lower in strength and also lower in embodied energy. The use of adobe is limited to a handful of natural builders who want a building that dissolves back into the earth when its life is over. Alas, adobe isn't that strong, so generally you want to use some concrete in the load bearing sections. One option would be to make a separate footing and stem wall (potentially using the rubble trench method for the footing, then capping it with a short concrete stem wall), then pour your adobe floor just like you'd pour a slab in the area contained between the stem walls.
One challenge with adobe is the very long drying time--potentially more than a month and the fact that the floor is likely to crack when it dries. The cracks, of course can be filled with more adobe, but there isn't much you can do about the drying time. Keep in mind that unlike concrete, adobe not only gets wet, but it expands and turns to mud when totally wet, so its even more important to have a good water barrier underneath it, although raising the entire slab up above ground level and putting plenty of drain-rock underneath is also a good idea.
Adobe floors are generally finished with multiples coats of linseed oil, which itself takes weeks to dry (unless you add an alkyd hardener), and will off-gas for at least a year, so if you are going the adobe route prepare for a long process.
The straw in adobe provides some strength, but any way you look at it, adobe is just not as strong as concrete. Some builders have added some Portland cement to the mix, but as that mix gets stronger, it also gets closer and closer to standard concrete.
Summary: Slabs are a great way to provide thermal mass for passive solar, but are harder to insulate in cold climates than they are in mild ones. They're generally cheaper than foundations, but on small lots you lose storage space.
Notes
1: There are better details for slab insulation here: buildingscience.com/documents/insights/bsi-059-slab-happy.
