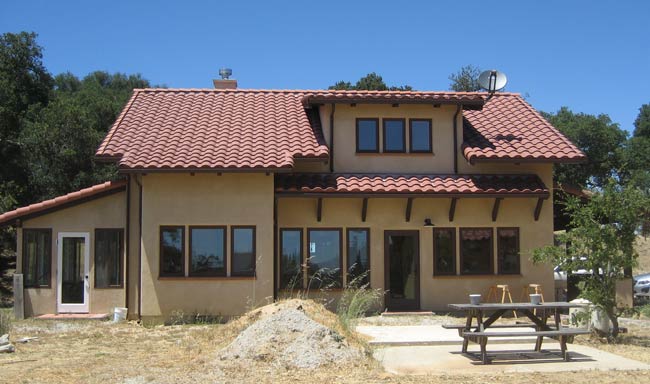
California Cabin - Energy
Envelope
This was originally intended to be a strawbale house, but due to cost concerns it was changed to being a double wall house using approximately 9" thick walls since that would give us approximately the same wall R-value as strawbale.
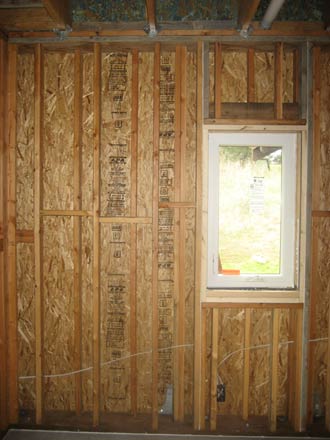
Double wall, 2x10 plates, staggered studs
The walls are built on 2x10 top and bottom plates and were built as one unit on the ground and tilted up whole. The builder thought that this would be easier for the crew, but my observation was that it was no easier than installing the second wall later and resulted in framing errors that would not have otherwise occurred.
To be fair, the complicating factor is that the windows are all recessed from the exterior by 2-1/2". This is an aesthetic decision that the builder uses frequently in strawbale houses to make the walls take on more of a traditional masonry or adobe look. While it does look very nice, it causes more thermal bridging around the windows, complicates framing and increases cost. The way it's done is that a box is built to span both walls, in this case out of 2x10s, and then a 2x4 frame in installed inside that box, but recessed the 2-1/2" from the outside, and then the windows are mounted on that 2x4 frame (this is somewhat visible in the photo at right).
The outer wall studs are on 16" spacing due to the heavy roof load (tile) and also a heavy seismic load (zone 4). The inner wall could have been done with 24" spacing, but the topic never came up, and it must have been easier to frame the inner using 16" spacing also. The studs are all staggered, but in all likelihood this improves the R-value by less than R1-but its no additional effort or cost, so why not? As with other houses in earthquake zones, there are more double studs and metal tie-downs than ever.
In addition to the thermal bridging at the plates and around windows, the framers started off using 2x10 king studs as well as that crew had never done a double wall before. However upon calculating the actual whole wall R-value for the south wall (which was the worst offender), the result was around R27, which is only about 10% worse than the predicted R30. Given that its a sunny, warm climate with a heavy marine influence (ie rarely very hot), none of this likely matters that much.
Due to a limited budget, we were looking for low cost windows and that limited the choices significantly. We ended up with Andersen 100 series Fibrex windows, which is a blend of vinyl and wood recycled from their other window production lines. Given that vinyl is on many environmental groups red list, even the fact that the vinyl is recycled makes them not very green, but the next step up (fiberglass or clad wood) would be ballpark twice as expensive, which would have added $10k to our budget. Maybe someday there will be a green budget window.
Unfortunately the fact that the federal government set energy standards for windows (for tax rebates) to only include those with low SHGC, most manufacturers dropped "northern low-e" glass from their product lines, so we were stuck using double pane clear glass for the south windows. We used low-e glass on the other windows-and those have a SHGC of .2, but a significantly better U-value (.29 versus .43). As with other choices for this house, the fact that its a very benign climate makes the energy penalty for these compromises fairly small.
The biggest difficulty with doors was that the building department insisted that all doors be fire rated--or well maybe they did--its not clear. At one point they wouldn't accept any standard fiberglass door, but then they Ok'd the use of fiberglass patio doors, so its not clear what they were really after. In the meantime we found a solid mesquite door made in Mexico that fit our aesthetic, and solid wood doors meet the fire code, so we ended up going that route even though the doors are only around R1. The benign climate again.
Air sealing
We used the spray foam on the interior of the sheathing method although we only sealed obvious holes: the sill plate to floor connection, the sheathing to sill plate connection, around windows and the various holes thru the top plate into the attic. In the two places where there was no sheathing, we spray foamed the Tyvec to the sill plate anyhow--but who knows how long it will stick.
Apparently this sealing was good enough--at least when there is a stucco exterior, because our blower door test result was 3.0ACH501, which is decent, but not particularly tight. I suspect the leakage is largely due to there being five exterior doors, and 3 ventilation fan holes. In retrospect I wish I had taped off the doors with plastic and ran the test again. Thankfully three of the five doors are completely protected from the wind (two by an enclosed porch, and one is to the attic). This is important because although the site is in a relatively benign climate, the coastal hill location is quite windy2.
Insulation
We went with BIBs fiberglass because it was what was readily available, and a reasonable choice. The only exception to this is in the ceiling below the unheated attic where the builder used 3 layers of fiberglass batts topped with 3-4" of BIBs loose fill. Using 3 layers instead of one makes it easier to fit around wires and pipes, but given how difficult it is to install batts around wires and pipes, its not clear how much better of a result we got. It mostly depends on the care the crew took to install it, and since we were away during install, we're riding in the reputation of the builder. The loose fill on top it theoretically helps fill voids, but whether there is any real improvement is unclear. Additionally there is a plywood floor over much of the unheated attic, so the loose fill area is pretty limited. But still there is approximately 12" of insulation in the ceiling everywhere, and the average coldest winter temperature is probably around 45°F: its in the 30s on clear nights and in the 50s on clear day, and on cloudy days its in the 40s. It is also the case that winter is usually very short.
So far the house had performed very well, so until there is a really cold winter, or I get my hands on an infrared camera, it will be hard to tell how well it was installed.

Slab insulation.
The slab is insulated along the perimeter and also fully underneath it with 3/4" R4 XPS (photo at right). In this method, you have to form the a small stem wall (see photo a right), which sits on top of the footing and is poured at the same time. The slab is then poured separately allowing the insulation to sit fully protected by concrete. The downside of this is that there is significantly more labor building forms for the inside of the stem wall, and the insulation amount is somewhat limited by the difference between the thickness of the framed walls above and the stem wall it sits on (ie you don't want the insulation showing, although if the amount is small enough, you could cover it with tile etc).
The sand in the photo is something done in California (and maybe other hot dry climates), and is there only to hold a lot of water to make the slab dry more uniformly. The sand is thoroughly soaked just before the pour and then the slab is coated with a thin layer of spray wax. The wax wears off quickly and the sand will eventually dry out as the moisture migrates thru the slab--obviously this makes it important not to cover the slab with an impervious material like sheet vinyl until the slab is thoroughly dry. In the long run the sand is just part of the thermal mass of the slab.
Given that the deep ground temperature is around 60°F, it not clear that full slab insulation is really necessary (or even desirable) but given that we have much more mass in our slab than we have corresponding glass area, at worst case it does nothing. In retrospect the perimeter insulation should have been much higher--at least 2" of XPS (R10) along the edge, and maybe the outside two feet of the slab should have been R10 also--in fact you could argue that the perimeter edge should have been 4" of XPS (R20)--at least if it was it would pretty much eliminate heat leaking out the slab. However, the amount of perimeter insulation is limited by difference between the thickness of the exterior concrete stem wall and the actual wall above it--you don't want the perimeter insulation showing on the inside. In addition, if the inner wall is going to be on its own plate then you need a way to attach it, which would further limit how much insulation you could fit in there. Using an infrared thermometer on cold days, the edge is definitely way colder then the center of the slab--as much as 10 degrees colder (58°F versus 68°F), but locally (about four feet in from the edge) the difference is only about 5°F.
In spite of all this insulation, the house apparently barely passed California's Title-24 energy code, apparently because they don't count passive solar design. For a house like this, all you get from Title-24 is an extra bill from the person who has to do the calculations. I'd like to say this is the first near-zero energy house in California that barely based Title-24, but I fear that every other passive solar house in the state suffered the same fate.
Passive Solar
South side on June 26th (approximate the solstice) 1:45PDT. The overhangs shade
the windows well past the sill.
The house was designed to be fully passive solar, although it's shape is far from ideal and it doesn't have nearly enough glass, although it does have plenty of mass for how much glass it has. More accurately, the south side of the house has plenty of glass, but the north side gets no passive solar. In spite of that, on sunny days the house is easily heated by the sun alone: the back section of the house does stay a little cool (in the mid 60s), but the main part of the house stays above 68 even when the outside temperature dips well below 30--that is as long as the previous few days were sunny and the floor (the mass) has been thoroughly heated.
Passive cooling is implemented via opening windows that point toward the prevailing winds, which are either from the southwest or northeast. The winds on this site are dominated by the local effects of the terrain--on a very local scale the terrain channels winds in the SW-NE directions and because we sit between a cold ocean and a warm interior from late spring thru most of the summer, afternoon winds are often from the SW (the ocean) as an interior thermal low sucks air inland.
Because the house is slab on grade is has significant thermal mass, and so it functions well it was acid-stained dark brown and left as exposed to the sun as furniture placement allows. There is about 500SF of exposed slab that's 5" thick, which is about 208ft3, which at 120lb/ft3 and .22BTU/ft3/°F can store about 5,500BTU/°F. Allowing for a 5 degree change in temperature the total storage is about 27Kbtu...which is probably around the amount of heat the house looses over the course of a winter evening, or enough for a couple of cloudy moderate temperature (50s) days.
Heating & Ventilation
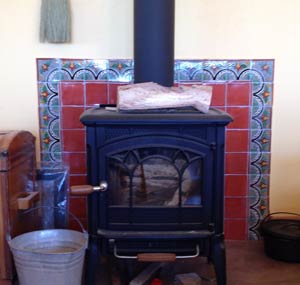
Due to the mild, sunny climate, no central heating system was installed. Instead, a wood stove is used to heat the main part of the house on cloudy days. This stove is air-tight, 65% efficient and produces very little particulate matter. Its rated for 40k BTU max, but the literature that came with the stove is confusing and it appears to never actually put out more than 25k BTU, which is fine because that's more than we'd ever need. In fact we rarely run it anywhere near full tilt.
Due to the air tightness of the house, it draws its combustion air from outside via a 3" PVC pipe which connects to the back of the stove via aluminum flex tubing. Like most wood stoves, it doesn't draw well until it gets hot, so initially it draws indoor air (that is the door is left open a crack), and because of this, its convenient that the house isn't that tight.
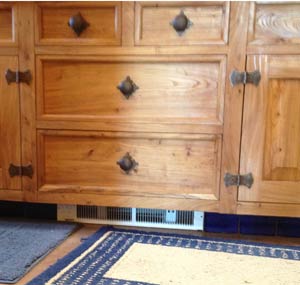
Since there is no heat distribution system (we drew plans for one, but never installed it), the main part of the house stays as much as 10°F warmer than the back of the house. We installed a electric toe-kick heater in the bathroom, run on a crank timer, which we use for taking showers. The heater runs at most 10 minutes a day. One thing we haven't worked out yet is that our offices are both fairly cold on cold cloudy days because they're too remote from the woodstove. Currently we either use portable electric heaters or just don't use the office--both of which are lousy solutions.
If this house had been in an urban setting, the backup heat would have been from a mini-split heat pump instead. We sometimes wish we had installed both.
Hot Water
We went with a Rheem heat pump hot water heater, although it wasn't actually our choice: it was the easiest way to get the house to pass California's Title-24 energy code. However, we've been happy with the unit. It's noisier than we'd like, but tolerable, and so far we've never ran out of hot water. I wish its output air vent was made so that you could optionally pipe the cold air coming out of it out of the space (there is now a unit that does that), but so far it hasn't been a problem even though unit is in the attic, and the vents to outside are in the roof (they're special fire prevention vents)--the cold air the unit puts out is more likely to sink onto the floor than go out the vent, so the only thing keeping the attic from getting quite cold is whatever air mixing happens due to wind blowing in the vents. If the unit had come with a vent, we would have installed a "T" with dampers so that we could direct the cold air outside from Nov thru April, and inside the rest of the year.
Sadly the unit failed after only a couple of years, and each time it got fixed it failed again. So it got replaced with a newer model, which itself failed in only six months. Its unfortunate because the unit worked quite when it worked, but my theory is that our power quality is very lousy (due to the remote location) and the unit wasn't designed to handle it. Because its one thing to get one these installed, and quite another to get them fixed (especially when you're ten miles from town), we ended up getting just a standard electric HW tank. Someday I hope to get a heat pump unit again, hopefully they'll be more robust and better supported by then.
Lighting
California's energy code, called "Title-24", has fairly strict, and from our perspective, well intentioned, but otherwise stupid lighting requirements. From previous experience our strategy was to put CFLs in the commonly used fixtures and incandescents in the rest, with the hope of upgrading the CFLs to LEDs when the technology is ready. Title-24 only counts a fixture as being "high efficacy" if its not an Edison base--ie if you can screw in a incandescent, as far as California is concerned, its not high efficacy. This assumes your goal in life is to waste energy, and from asking around its an assumption that has sent many cheap title-24 complaint fixtures to the landfill. Further, there is no limit on total wattage--as long as its high efficacy, you can put in as many as you want--in fact you can put 50% of of kitchen wattage in incandescents as long as the other 50% ie high efficacy. So the trick people use is to litter their ceiling with GU-24 CFL can lights that they never use. The title-24 code also requires motion sensors and/or dimmers (I think only if you don't use high efficacy lighting)--so is Ok to leave a CFL on all night, but..well you get the picture. While I'm sure there are people who aren't good at turning their lights out, it doesn't make sense to me to create a building code around it.
In order to comply, we put in motion sensors where required and put in cheap GU-24 ceiling lights so the kitchen would comply, then took them all out again. All of the fixtures in the house are Edison base, mostly the common medium base, but three of them are candelabra. There are also pole lamps and table lamps, all with Edison base sockets. The kitchen also has three 24" T-5 slimline (13W) fluorescent under-cabinet fixtures. The kitchen also has 4 pendant fixtures made from recycled alcohol bottle (see bottlehood.com): 3 of them have CFLs in theme and one has a Cree lighting 9W LED (2018 update: all bulbs were replaced with 9W LEDs in 2017). The only commonly used fixture that is not current high-efficacy is the dining room chandelier, which is on a dimmer. Alas, although the fixture has standard medium base sockets it a hand made wrought iron fixture that only looks good with candle shape bulbs in it, so as soon as I can find LED bulbs that will work there, I will convert them and the dimmer as well.
Compared to most houses, we have very few light fixtures, and no can lighting at all. We live in a very rural location that is very dark at night, and we like it that way. As it turns out, we very capable of screwing in high efficacy bulbs and equally capable of turning them off when they're not needed. Given that the federal government has now banned the sale of many incandescent bulbs, title-24 needs a rewrite. So far our 1.8kw PV array has kept us near zero electric use even on a month to month basis, so clearly lighting is not a big energy use for us (given that the HW, stove and dryer are also electric).
Appliances
As in the past, in order to get the most efficient refrigerator (or least something near it), we had to order it. We kept our old Fisher-Pakyel washer (which is reasonable efficient, but 10 years old), and got an induction cooktop (which aren't rated, but are much more efficient than standard electric cooktops), and got a Bosch dishwasher which was one of the most efficient we could find (this model chosen because it had a built-in water softener, which seemed better than trying to do a whole house softener).
The only dubious power draw is the satellite internet, whose modem we suspect draws quite a bit of power (some day I'll get my own kill-a-watt meter and measure it). We ditched the satellite internet for a lower power option in 2016, but also added a cell phone booster, so not clear how far ahead we came out in the trade.
Notes
1: Previous versions of this site reported the value as 1.5ACH50, which unfortunately isn't the case. It was a math error on my part.
2: We don't have any average wind speed measurements, but the wind blows 20-30mph on a regular basis, and will go over 60mph at least once a winter (ie so hard you can barely stand up).