Seattle - Health
Moisture
The most important thing for a healthy house is keeping liquid moisture out because its the one thing you can do with certainty (keeping moist air out is much harder), and since Seattle is a very wet climate and there appears to be an underground stream thru our lot, we took extra precautions to keep water out. Our concentration on liquid water was also because Seattle summers are really quite dry, so moisture vapor problems are not as acute as in the east.
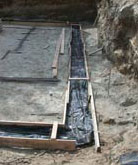
break under footing
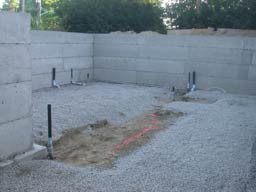
Starting at the ground, we extended the normal poly sheet moisture barriers (they're really just capillary breaks) under the footings as well (photo at left). While this poly sheet probably should have been run wider than it is so it could overlap the other barriers, its likely still better than none at all, and since both sides of the footing end up buried in coarse gravel, its likely that the barrier works (plus the floor has stayed very dry in spite of a stream of water seeping out from the hillside at the edge of our lot all winter long).
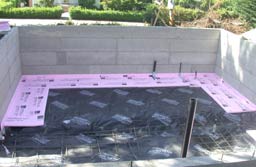
Under the slab we installed 6" of coarse gravel (see photo below) and then covered it with a thicker than normal poly sheet (10mil instead of 6mil--see photo at right). The dirt area in the gravel photo is for a footing that supports the central load bearing wall, and so there is no gravel there. While this could be a weak spot, the entire area is still covered in the heavy poly sheet before concrete--so its protected from moisture--it just doesn't have the double protection of gravel and the poly sheet. In the photo at right, the footing runs left-right at the bottom of the photo.
The exterior of the foundation walls got double protection also: we used a cement based water sealer and then covered that with drain fabric (see photos below). The cement based sealer should last as long as the foundation, while the drain fabric reduces the work that the sealer has to do. Once that is in place, we installed the traditional perforated pipe perimeter drains, buried them in gravel and then covered that in a geo-textile fabric before backfilling around the foundation.
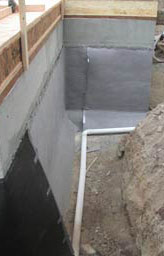
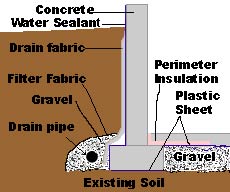
The drain fabric was the most unusual moisture preventing thing we used. This is a two layer material: the inner layer is heavy plastic material that is formed into a grid of little divots, each one about 1/2" wide, and maybe 3/8" deep and an inch apart. The divots go up against the foundation so the contact area is much reduced, and mostly there is only air touching the concrete. The second layer of the material is typical geo-fabric which keeps the dirt out. The key, of course is how its attached at the top since its only effective if the air gaps created by the dimples don't fill with dirt. The difficulty is that its a bit awkward to install--you either have to hand nail it with concrete nails (but the concrete chips easily), or use a ram set gun (tedious because you use a lot of nails). In addition the material doesn't bend easily-it was a bit of a challenge to run it around corners. We ran it long so that the perimeter drain sat over it a little (you can see the excess splay out in the photo), in hopes of keeping the footing dry, and here you can see that it doesn't bend easily.
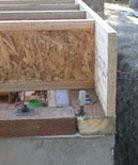
The water sealing process on the foundation is then continued up thru the walls. First we used an air sealing material under the sill plate that will act as a capillary break (photo at right: it's the thin white area barely visible between the concrete and the sill plate). That step completes the foundation water barrier.
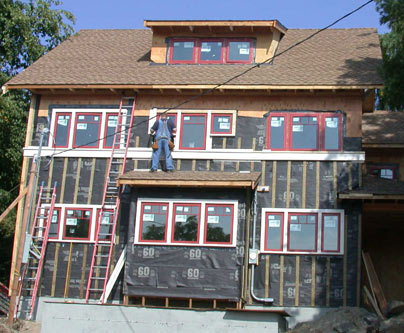
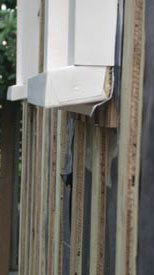
The walls also received additional water protection: on top of the normal water layer (which in this case is tar paper) we installed a rain screen using strips of 1/2" pressure treated plywood (photo at left). These strips create an air gap behind the siding which serves two purposes: first it allows the drainage plane (the tar paper) to flow freely and second (and more importantly) if moisture does get in, it provides air flow to help dry it out.
There are a lot of nuances to installing a rains screen, mostly having to do with providing continuous drainage and ventilation, for example around windows. Our solution was to run the plywood strips just a bit short on both sides of windows, so that air coming up under a window can flow around the side of the window and any water dripping down will run off the side of the window as well. The bottom of the each cavity is filled with a 2" strip of plastic fiber mesh, similar to the green scratchy pads used to clean kitchen pots which serves to keep bugs out. At the top, the siding stops just short of the eaves--about 1/4"--short enough so that nothing gets in, but plenty big enough to let air out.
The windows themselves are done a little different as well. First we installed a strip of beveled cedar siding at the bottom of every window opening (called a "sill pan"), then installed flashing around the window as normal (ie bottom to top). The bottom piece goes over the sill pan so that when the window sits on it, any water that gets under the window is drained back out by gravity. Because of the rain screen, we then installed more strips of plywood as a frame around the opening and then the window flange sits on this instead of on the sheathing. The bottom of this frame around the windows has gaps so any water can drain out (see left photo below). A heavy bead of caulk was put along the edge of this frame and the window then pressed into the caulk: this is just another layer of protection against water entry as well as some additional air sealing. The windows also have the traditional casing around them, and it too must sit on the rain screen. Since we wrapped all of it in power coated metal, we tucked the metal under the window flange whenever it made sense--although mostly this is just to keep the wood core of the casing dry: the drainage plane of the house is still underneath all the furring strips.
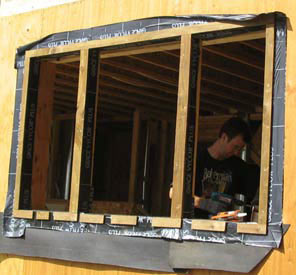
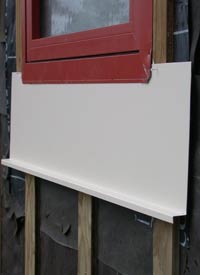
Installing
windows on a rainscreen: sill pan and flashing furred out to put windows in
the same plane as
siding (left). Window installed and metal wrap piece tucked under in prep
for window trim (center). Window trim installed (right).
Paints, Finishes, Glues & Caulk
We used low VOC caulks and adhesives (ie the liquid nails type stuff, but that brand). Almost all of the interior paint is low VOC/low toxic (AFM Safecoat), although as we went we moved to other low VOC brands due to the suppliers being more convenient and a different color selection. One challenge we found with using low VOC paints (which probably doesn't exist anymore) is that these paints tended to be a bit thinner than normal paint and so the painters didn't like them. In addition, painters all tend to work with a limited number of suppliers because they get a better deal (and trust the product).
For clear finishes, we used a spray catalyzed varnish that was applied off site. Since wood was finished off site then fit on site, we did have to finish cut edges, and for this we used Daly's Pro-fin (similar to Watco or other oil finishes), which is a oil finish that is anything but low-voc and likely fairly toxic. But it's easy to apply, easy to repair, extremely durable, and not toxic after it cures, although complete the cure time is weeks if not months. Luckily the site applied finish applied to probably less than 5% of the total clear finish surface area, and we moved in in late spring, so the house could air out all summer.
We avoided the use of any wood or wood product labeled "interior" (although this doesn't apply to cabinet plywood which is not graded as interior/exterior), because most interior grade wood products are made with Urea-Formaldehyde glue, which not only off-gasses formaldehyde, but does so for 10-20 years. When you are stuck using interior grade wood products, plywood is much better than MDF or particle board because it has a lot less glue in it. Luckily some MDF is exterior grade (we used it for stair risers). The cabinets in the ADU are MDF, but since they're from IKEA who has to comply with much tighter European standards for formaldehyde emissions, they are actually very low VOC.
The house has no carpeting, and instead uses linoleum as a lower cost flooring (although admittedly its much more expensive than carpet).
Random Toxics
We used pressure treated wood for sill plates, the rain-screen and porch framing. While they had just phased out the old CCA pressure treated wood, and we used one of its replacements, the wood is still laced with copper. We probably could have used regular ply for the rain-screen, and if we'd wrapped the sill in a peel-n-stick membrane, we could have avoided it there also, but who knows what's in the peel-n-stick product. Of the three porches, only one is truly exposed to the weather, and for the others maybe we could have used pressure treated only for the ledger, but then the porches are concrete and will absorb water, so using the cautionary principle probably makes sense.