Seattle - Materials
Deconstruction
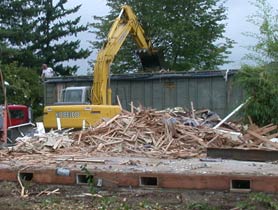
The site had an existing house and the new house originally was planned as an extensive remodel, but existing house had only a limited crawlspace, the house wasn't tied to foundation at all and as far as we could tell, there was no damp-proofing on the existing foundation. By the time we tried to retrofit that in, it cost more and didn't clearly save any materials, so we deconstructed the original house so the material could be reused.
Most houses end up in the landfill via
a process that looks like this.
Most houses are crunched up and sent to the landfill in large dumpsters. Deconstruction is just the opposite of construction, and its done in the reverse order. Anything of value in the interior is salvaged first, then the siding and roof come off, then windows and doors, then the rest of the interior: drywall, plumbing and electrical, then finally the stud walls are taken down and the studs de-nailed. Compared to the crunch method, which take only a day or so, the entire process took about 8-10 days, with the actual number being a bit nebulous since it was hung up a bit because there was asbestos in the kitchen plaster which needed to be removed by a specialty contractor before finishing the deconstruction. Our cost was approximately the same as it would be have been to smash it up, but in retrospect we got an amazing deal: the price (2004 dollars) should have been more like $15k then $10k. The deconstruction was done by the Re-store a local non profit that also sells salvage material.
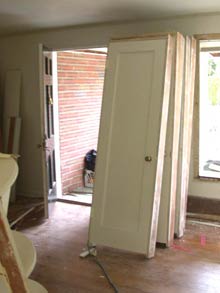
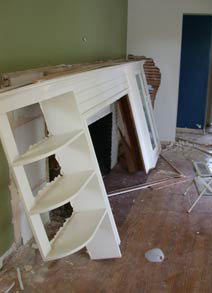
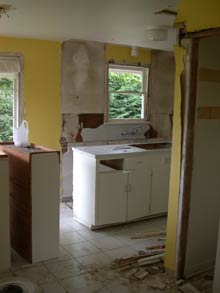
Interior door (left), fireplace mantel (center) and cabinets (right) all went to the salvage store.
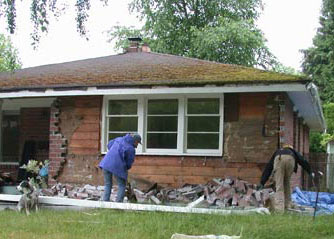
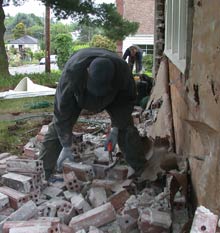
Bricks are
removed from the exterior. While many do get broken in the removal
process, 60-70% of them
get salvaged. First they are cleaned with a hammer, then any stubborn
material is removed with a
tile saw. We reused most on of them on site in a large landscape
wall
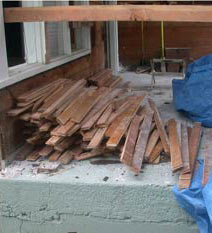
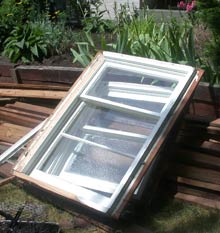
Cleaning bricks (left), the beginning of the pile of salvage flooring (center),salvage windows (right)
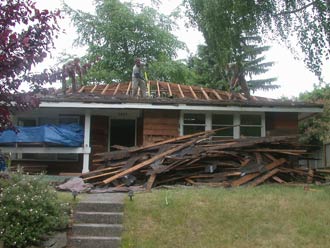
Removing roofing, and roof sheathing (left). Removing lath and plaster (right). At the time, we could find no use for the sheathing so it was probably ground up for compost or burned. This same fate happened to the wall sheathing. In retrospect it can be planed down and makes beautiful lumber, but since its mostly 3/4" rough sawn, you only get at best 5/8" out of it. Likewise there isn't much use for lath or plaster, so it probably ended in the landfill.
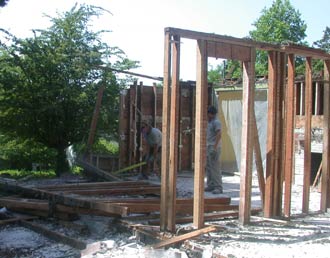

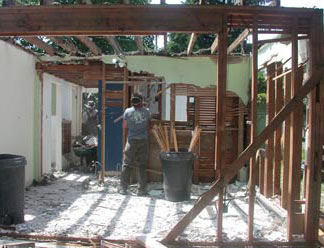
The framing lumber is removed wall
by wall: first the walls come down, then they're taken apart (left).
The individual pieces of lumber are then de-nailed (right). The process
is fairly brutal because labor is still more
valuable than the lumber, so many 2x4s get broken. All the larger
lumber (4x4s, 6x6s, 2x8s and 2x10s) are treated a bit better, although
they're also generally easier to remove. While we lost many 2x4s to
breakage, all the larger lumber was salvaged. The one disappointing
aspect do the process was that the walls of the old house were short,
so we couldn't use the studs in the new house--we ended up trading them for
studs from another deconstruction project.
Early on two dumpsters showed up: one was for comingled waste and the other was for clean wood. In theory the company separates the comingled stuff and recycles what they can, but we got no feedback on whether this actually happened, which undoubtedly had more do to with the economics of the situation at the moment than anything. In the end all that was left was the foundation and the brick pillar for the fireplace that for some reason wasn't salvageable. The concrete was broken up by the excavator and sent to be recycled (but then everyone does that around here), while I managed to salvage maybe 20% of the remaining bricks, the rest went with the extra dirt to a fill site in a former quarry.
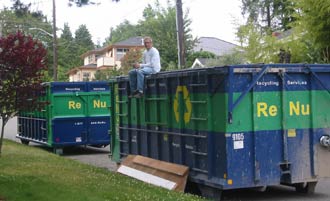
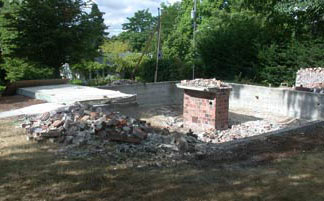
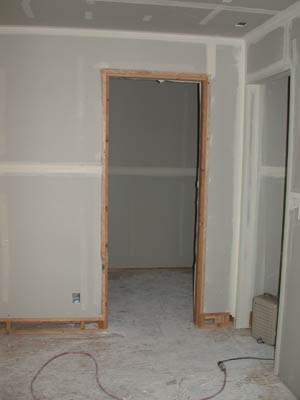
Comingled and clean wood dumpsters (left), house after deconstruction (right)
Salvage Material Summary
Asphalt (Composition) Roofing
This all went into the co-mingled dumpster. While we expected this
material to be recycled, we later discovered that the recycling contractor (ReNu)
does not recycle asphalt. There was approximately 1180SF of roofing.
Lath & plaster walls, Sheetrock, painted woodwork
There is approximately 2900SF of walls. All of this went in the
co-mingled dumpster.
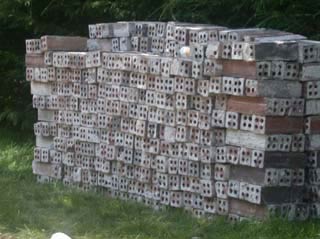
Bricks
We salvaged 1000 bricks for a patio wall we intend to build in the future
(see site design). In
addition, the Re-Store took away a few pallets of bricks for sale in the store.
Structural wood, sheathing & sub floors
All pieces larger than 2x4s were recovered at a very high rate (90%+), but 2x4s
were recovered at a much lower rate. All the sheathing from the roof ended
up in the co-mingled bin (because much of it had asphalt or shingles stuck to
it). All the 1x8 wall sheathing ended up in the clean wood bin, as well as
the floor sheathing. Apparently there is no market for any 1x material with
knots in it.
Interior items
All cabinets, light fixtures, plumbing fixtures and Electric baseboard
heaters are salvaged for re-use. The house had quite a number of recent
vintage low cost fixtures which appeared to end up in the recycle heap.
Oak flooring
The house had about 600SF of oak flooring of two different ages, one relatively
recent and the other probably original. Both measured out to be very close
to a full 3/4" thick, indicating that the floor had never been heavily sanded,
and so highly re-useable. There was about 60sf of hallways, and one room
was done almost entirely in short pieces, so normally much of that would end up
in the recycle pile, since only longer board tend to sell. We decided to
salvage it all, in the hopes that we could use the hallway short pieces in
another hallway, and do one of the lesser used rooms totally in short pieces.
We will probably have to purchase additional flooring since we need more than we
have.
Plumbing (copper & galvanized) and Electrical wire
All of this goes to scrap metal recycling.
Nails - unknown
Interior trim - all was of low value and went to the co-mingled recycle
bin.
Exterior trim - salvaged the porch rails and the treated 4x4s inside the
columns. There was no other exterior trim.
Windows
Many were sent to the re-store for sale, but others ended up in the
dumpster. Presumably there is only so much of a market for single pane
windows without much character.
Tile - all went to the co-mingled bin, and from there to the landfill.
Vinyl flooring - all went to the co-mingled bin, and from there to the
landfill.
Pergo flooring - we believe it will be sold, but are unsure.
Rear Deck - Bob de-constructed
it, and gave it to a neighbor who used most of it.
Appliances (Refrig, Stove, DW, H/W heater)
We will reuse the Stove & Refrigerator in the ADU (although its unlikely that
the refrigerator is energy-star rated, it is less than five years old, so is
most likely relatively efficient compared to older models. The stove is an
electric model, also less than five years old. We sold the Dishwasher,
which was also relatively new.
Concrete
(left for excavation, but recycled) approx 415 cu ft
We ended using a bunch of broken concrete for landscape projects the next year,
but because we didn't have storage we used someone else's old concrete.
Framing
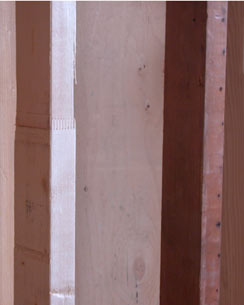
Finger-Jointed stud (left)
Reclaimed stud (right)
There is a significant amount of non-load bearing lumber in a double wall house, so we used as much reclaimed material as possible and also used a bunch of finger jointed lumber. Since the engineer Ok'd using 24" spacing for both walls, the actual wall stud use was probably 1.5-1.8 times what a 16"o.c. single wall would use, although clearly nearly 2 times the stud use of an advanced frame single wall, but of course our double walls insulated nearly 3 times better.
The problem with reclaimed is that much of what we found was surprisingly not straight--about half of it. I suspect this has more to do with them being warped from being in a sagging structure than that they were originally crooked since the lumber was from the 1950s, but who knows?
We only ended up using about 120 or so 2x4 studs and maybe 20 longer 2x4s for use as plates. Finger jointed lumber turned out to be nearly twice the cost of regular 2x4, so we limited its use for cost reasons. In general our wood usage was higher than it would have been had it been built a few years earlier, due to changes in the earthquake code and an increase in the assumed snow load.
We also bought as much FSC sustainably harvested lumber as possible, but it didn't take long till we'd cleaned out every supplier in the area, so we ended up buying a bunch of SFI lumber as well figuring that SFI is better than nothing, even though at the time many accused SFI of being more green-washing than green (it seems like SFI has gotten better, but the controversy still rages).
All the floor joists were I-joists, but you can't really call that green because almost everyone does that simply because its a better floor. We did use SIPs on the roof, and although the claim is that they save lumber, its not clear they do. The SIPs are 4' wide with essentially an I-joist at every junction. So compared to 24"o.c. rafters that's half as many, but there is plywood on both sides, so that's twice as much.
What's probably more relevant is that we attempted to keep the size of the structure down, and we kept the shape simple so there is not really any complex framing. In keeping the layout simple, we also tried to think of others might use the building in the future, but we won't know how well we did until some else lives in it. (see also adaptive reuse below) At the time we also asked for engineered wood instead of large timbers, but now that FSC lumber is available, it would be preferable since engineered wood is pretty much never FSC.
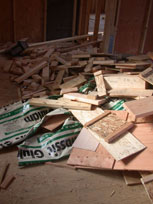 The scrap pile kept growing bigger than we'd like. This was the first of three big piles.
We also minimized waste thru jobsite recycling. This is better than throwing it all in the dumpster, but not as good as keeping the piles of scrap sorted and using them when you need a short piece. Unfortunately this isn't something framers normally do, so you either have to do it for them or pay them extra to do it--at least until lumber is expensive enough that its worth it for them to do it. This isn't to say that scrap never got used--sometimes it did, just not nearly as often as it could have been. Some lumber is easier to reuse than others: 2x4 scrap have lots of uses, but random chunks of 4x8, I-joist cutoffs and scraps of plywood are harder to use, but then I think if we all put our minds to it, we'd find uses, even if it wasn't in framing, for example I've made many garage shelf supports from chunks of 2x4 made into a box.
As you can see in the photo at right, framing is a messy process: in addition to cutoffs, there is a lot of wood that gets used for temporary bracing, although much of that gets reused in framing, not all of it does, and like most custom homes, we changed our mind about a few minor things and so there was a small amount of remodeling before framing actually finished. We also used quite a bit of extra blocking due to my idea for low voltage wires behind the baseboard. Overall we did far better than standard construction, yet there was clearly room to improve.
Adaptive Reuse
In addition to trying to make the layout be flexible enough that others could remodel it for their use, we also thought about how utilities could be upgraded in the future. There wasn't much we could do about the forced air heating system--you could replace it with hydronic, but you'd have to tear out a bunch of sheetrock .
We did hope we could put all the electrical in easy access chases, but in the end we couldn't think of an easy way to put the power in chases (at least not ones that looked good and met the electrical code), so we ended up putting the telephone, coax cable and internet wires in chases behind the baseboard, and occasionally under the flooring or under door casing to get past a door opening (see photo at right). The baseboard is paint grade so we screwed it in with trim head screws (this turned out to be tedious, maybe its because we didn't use self-tapping screws, but even if we did screws take many times longer than shooting a nail with a nail gun. In retrospect it was a mistake to put any of it behind door casing because the door casing is all clear finish and so it got nailed in. Pulling it off an putting is back on it at least as hard as patching sheetrock. While having chases is a good concept, this wasn't a very good implementation.
Concrete
We used 43% flyash in all concrete except the slab (and the sidewalk because the city specifies what mix we had to use there), and we used 25% flyash in the basement slab. The flyash came from the Centralia coal plant, which is class C, and hence can substitute for Portland cement. The lower amount in the slab is due to flyash changing the "feel" of how the concrete finishes, so unless the finishers have experience with working with high flyash content concrete, you can't use more than 25% (and even at that they complained about it being hard to work with).
The savings in Portland cement are as follows: the footings and stem walls used 31 yards, at a savings of 150lbs (approximately 1.5 sacks) per yard, so a total of about 45 sacks of Portland cement was saved there. The slab used 22yds, but only saved 100lbs per yard: still the savings is another 22 sacks for a total of 67 sacks (or approximately 6700lbs). The rainwater tank used an additional 14yds (approximate) of 43% flyash concrete, but since the tank is optional its hard to say that we saved Portland cement (we could have used a series of polyethylene tanks instead).
Otherwise the house used as much or more than typical construction. While the slab is normal thickness, the foundation walls are 9" which is thicker than normal. We also built a concrete rainwater tank, which used about 14 yards of concrete. With all uses included (footings, basement slab, foundation walls, sidewalk section that needed to be replaced and the rainwater tank, we used about 70 yards of concrete. Conveniently the NAHB statistics for that time say that the average house uses 120 tons of concrete, which is about 74 yards (assuming the concrete averages 120lb/ft3 if you assume 140lb/ft3 its 63 yards), which is very close to what we used.
We did look at using ICFs for the foundation, but the cost was nearly double, so we didn't do that for budgetary reasons.
Finish Materials
Almost all of our flooring is either reclaimed, re-milled or sustainably harvested wood. The main floor uses about 350SF of FSC madrone (a tree that used to be left behind because it doesn't grow straight, and tends to twist when it dries) and about 150SF of cork tiles that came from a reject pile. The second floor uses about 400SF of "South Wales Blend" which as it's name say is a mix of wood that originally came from Australia, and another 250SF of reclaimed Oak from the original house. The rest of room on the second floor use marmolem, tile and OSB. The entire 600SF of the apartment is marmoleum. The 3rd floor office uses another 150SF of the Oak flooring from the old house.
The trim in the house (window & door casings and baseboard) is either reclaimed Douglas fir from large timbers or FSC southern yellow pine. The fir was delivered cut to size and planed, but not culled, so they send us 30%-40% more than we needed and let us do the selection. That turned out to be a bonus in terms of our ability to use the wood efficiently, but there was a hefty learning curve in mapping the wood we had into the pieces of lumber we needed, and then there was an even more tedious process in trying to make the reclaimed wood look---well not particularly reclaimed.
Part of the learning curve for us using the reclaimed fir was that we (me and the finish carpenter) were both trained to use "perfect" lumber, so we both shied away from using anything that was a bit beat up and when it did have "defects" we patched then--alas very inefficiently because it took us a while to figure out what the right patch compound was (many of them shrink when they dry). In retrospect the key to using reclaimed wood is to let the "defects" show (at least the non-structural ones, you still can't use wood that's checked all the way thru or else it will likely crack in half when you nail it).
It was never clear what that any of the countertop choices were truly green, so we went with something that had as much of a classic look as we could find and durability, which lead us to Quartz composite countertops (Caesar stone was the original brand, we used Cambria).
Our kitchen cabinets are cherry on FSC ply boxes. The cherry part (which is only the face frame, drawer fronts and door rails and stiles) is apparently harvested sustainably, but was probably not FSC. Likewise the cherry plywood probably wasn't FSC. The upstairs bath cabinets are alder, again not FSC as its not clear it was even available then, and again most of the cabinet is actually the FSC plywood box. The guest bath vanity is made from scrap fir left over from the window and door trim. The apartment cabinets are all Ikea, which means they're all particle board but unlike most particle board this stuff emits very little formaldehyde, because Ikea sells the cabinets in Europe, and the European standard is much higher than the US.
Most of the clear finishes are catalyzed varnish that was sprayed offsite (its not clear how toxic the varnish is when applied, but doesn't off-gas once cured.) All the paints where low or zero VOC, and many of them were Safecoat, which is a low toxic brand.
All the glues and caulks used on-site were low-VOC.